Russian Army Binocular 15x110

February, 2008
Shigeki Murakami, Japan

* I post this report since I was asked to write on the binocular by an Italian binocular enthusiast, Mr. Paolo Morini. The article has translated into Italian and is posted on http://www.binomania.it/binocoli/15x110/15x110.php 


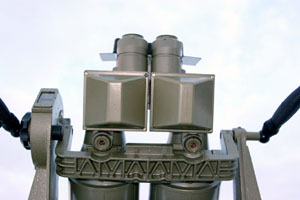
Photo 1 The casings and the mounting

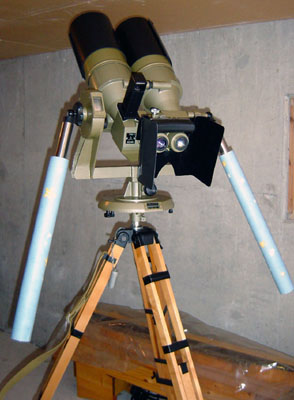
Photo 2 The whole view

Introduction

I purchased this binocular in 2003 from a Japanese dealer, Kasai Trading, Tokyo, Japan, for comet hunting (Photo 1, 2). The dealer called this binocular gSuper-Bino 15x110h, and it costs about 300,000 Japanese Yen (some 1,900 Euro) at that time. The binocular disappeared from the Kasaifs catalog at present, but they may deal in it. The original mane is g110x15 Binocular PNB-1h, which is manufactured by Novosibirsk Instrument-Making Plant (NIMP), Russia, from where you can buy it directly. It is wonderful we gWestern peopleh can buy such attractive gEastern productsh as they say in the Web Page; gHigh level of skill in the optic producing, that was achieved in "cold war" years in USSR, now serves for the production of first-class telescopesh. The manual states that you can operate this binocular from plus 50 to minus 50 degrees Celsius. Just only looking at this specification you know how sturdy this binocular is! Under such high or low temperature your body is in trouble before the binocular goes wrong.
Another 15x110 model with different type of mounting that has a 70 degrees maximum angle of elevation, PNB-2, is also manufactured by NIMP, but I opted for the present model, PNB-1, because it has a 90 degrees maximum angle of elevation; more suitable for astronomical use. As I mention later, this choice may not be correct.
The manual of this binocular is available via Internet. Basic optical and mechanical features are displayed in this manual with the Tables and the Figures, and please refer to it to read this article. The instrumental description hereafter is based on the manual and the catalogue of Kasai Trading issued in 2000.


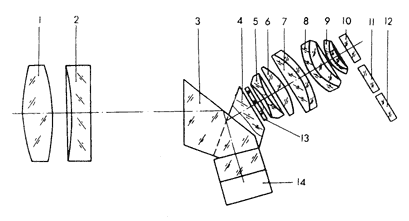
Online manual Fig.1. Basic optical train
1, 2, 5, 9 - lenses; 3, 4, 14 - prisms; 10 - neutral density filter;
11 - light orange color filter; 12 - blue-green color filter; 13 - reticle.

Dimensions, weight and portability

Dimensions of the binocular are shown in Table 1. The binocular casings with the altazimth mounting are stored in a big wood box, and you have to carry the tripod separately (Photo 3). You cannot detach the casings from the mounting in the daily use. The total weight of the instrument with the box is 37 kg. This is too heavy for me to carry for daily observing session. I never carry the binocular with the box, instead I convey bare binocular casings with the mounting (21 kg) from the storeroom to my car leaving the wood box. Another model whose mounting has more simple structure, PNB-2, weighs only 13 kg (the casings with the mounting), and it would be preferable from the view point of carriage. The strap of the tripod is convenient to carry, but you have to be careful for the keen ferrules.

Table 1 Dimensions and weight of the 15x110 binocular, PNB-1
Some of the values that I measured or based on the catalog of Kasai Trading are different from those of the manual.

Size (mm) Weight (kg)
Binocular casing

Maximum length: 385 (when hood are extended 458)

Maximum width: 570 (including handles)

21

 (including mounting)
Wood box 640 x 490 x 430 16
Tripod length 930 to 1480 5


 Photo 3 The instrument in the wood box and the tripod

Photo 4 Attachments. Some parts are not unwrapped.

Attachments and accessories

The following attachments are wrapped in paper and cotton (Photo 4). Such non-plastic and classic wrapping is cozy!
Three kinds of filters:
    Orange filter: for fogy weather, low illumination intensity of the terrain, and low contrast of the objects.
    Neutral filter: for bright dazzling light.
    Blue-green filter: for protection against radiation of the laser.
All these are of daytime use, and are unnecessary for astronomical purpose.
An extra pair of desiccators:
As mentioned in the next section, the desiccator with silica gel is installed in each casing. These are replacement parts.
An extra round level:
I wonder if this replacement parts is necessary since the level would not be damaged.
A brush and napkins for optical cleaning:
The brush with wood stem and classic napkins remind me of the good old days.
Wrench, screwdriver, and pipe connection:
These are wrapped in oilpaper with grease (Photo 5). The wrench is for the desiccator, but I do not know what the pipe connection is for.
A cover:
The material is non-water proof (left in the wood box in Photo 3), and is not effective for night time use when the dew falls .
A manual:
The online service manual includes 11 pages and some figures of the original printed service manual that has 51 total pages. However, the contents of the printed manual that are not displayed on the online one are details of mechanics and parts replacement. The online manual is enough for users.


Photo 5 Attachments wrapped in oilpaper

Photo 6 The binocular viewed from the underside. A pair of round parts is desiccators

Casings and optics

As the binocular is originally designed for air targets as well as the ground ones, the eyepieces are inclined 30 degrees to the optical axes. The finish of the casingsf surface looks somewhat rough, but it does not affect practical use at all. The length of the casing is made shorter by a prism system that once leads an optical path downward before entering the eyepiece (Fig. 1 on the online manual). The objective comprises of two separate lenses (Fig. 1 on the online manual), and the first lens is an aspherical one. The eyepiece is 8 elements 5 groups with 90 degrees apparent field of view. Lenses are multicoated, but the field of view looks yellowish in daytime due to haze-cut coating: the binocular is made for the military purpose and is haze-cut coated to improve S/N ratio especially during the twilight use. For the night time use, i.e. astronomical purposes, you cannot recognize yellowish color at all. Kasaifs catalog states the coating reduces skyglow and boosts contrast in the field. The manual says light transmission is 50% that is rather low value I feel, and the haze-cut coating may be the cause of this.
A reticule is inserted at the focal plane of the right optical tube assembly (Fig. 1, 3 and 7 on the online manual), but you cannot see this during nighttime use. If you are eyeglasses wearers as I am, you can view almost whole the field with your eyeglasses on, since the eye relief is 15 mm; as this eye relief is the minimum value for eyeglasses users, it slightly vignettes near the edge of the field (more than 90% from the center of the field). Whether or not you are eyeglasses wearers, you need to keep your face at the steady position relative to the eyepieces to peer into the field. A good point of this instrument is that you can do this easily employing a built-in headrest that is extendable. The diopter setting ranges from minus 3 to 5.
A pair of desiccators filled with silica gel is screwed into the undersurface of the casings (Photo 6). You can check the condition of silica gel through glass windows of the desiccators. You can remove the desiccators with the wrench and dry silica gel using an oven if you need. I have never done this since I bought this binocular (for more than four years), because color of silica gel is kept bluish: I usually store the casings with the mounting in a sealed big plastic bag with about 300 g of silica gel to avoid mold growth (Japan is a humid country) and this may be the cause of maintenance-free to date.

Mechanical features

An extendable tripod is solid and durable. There is a pivot with a diameter of 22 mm on the tripod head that is inserted into the base of the altazimth mount.
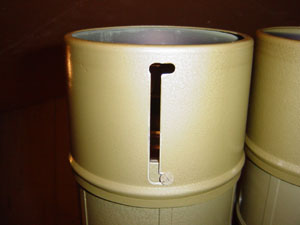
A pair of built-in lens hoods is convenient, but it is sometimes hard to draw it out (Photo 7). A single bolt works as a stopper and a guider, and you slide the hood out along the rift in the hood. While you are pulling the hood out, it is loose and you have the feel of an obstacle. However, once extended, it is firmly fixed. When you retract the hood you may have the feel of an obstruction again.
Interpupillary distance can be adjusted by turning a knob on the lower right side of the right casing (a silver colored knob in Photo 1). It moves the right side casing smoothly, and you can adjust interpupillary distance with ease.
Friction for both vertical and horizontal motion is changeable by using a knob on the left side of the altitudinal axis and a one on the azimuthal axis, respectively.
Two rubber shock-absorbers fixed inside of the left fork-arm (Photo 1 and 6) limit the vertical motion from minus 36 degrees to 90 degrees. The binocular itself can be trained on 90 degrees in altitude, but you cannot look into eyepieces at this high altitude since your chin interferes with the base plate of the mounting: you can observe up to some 80 degrees.
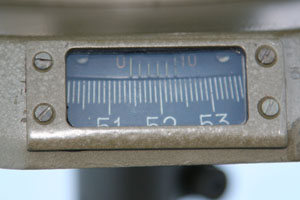
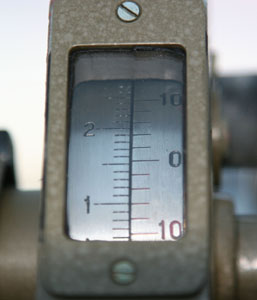
Azimuthal and altitudinal limb are graduated up to 600 and 160 (100 to minus 60), respectively. Since one division is 0.6 degrees they correspond to 360 degrees and 60 to minus 36 degrees, respectively. Using the verniers the minimum readings are 0.2 divisions, i.e. 0.12 degrees. The scales are clear and easy to read (Photo8, 9). You can rotate azimuthal limb by loosing a knob beneath the mounting base and fix it at any azimuth; i.e. you can set any azimuth to zero on the limb.


Photo 7 A lens hood viewed from the underside


Photo 8 Azimuthal limb with vernier. The reading is 514.4, i.e. 308.64 degrees.

Photo 9 Altitudinal limb with vernier. The reading is 15.4, i.e. 9.24 degrees.

Optical performance

In daytime I aimed the binocular at a distant pylon. The image was brisk and vivid with high contrast at the center of the field, but I did not feel that the image was bright due to yellowish color of haze-cut coating. The overall image was flat and distortion-free, and I did not notice distortion at a glance. With a careful look the image deteriorated near the edge of the field. Then, I looked at the top of the distant pylon and observed changes in the image. It began to deteriorate at about 70% from the center of the field, and it got worse gradually toward the edge. Over 90% from the center, it abruptly got worse. Even so, as I mentioned before, I have an impression that the overall image was flat and distortion-free enough, and the central image was superb. I have never experienced false color with this binocular aiming even at bright objects.
Star image at the center of the field was perfect pinpoint with high contrast. Distortion near the edge of the field stood out much more than in daytime. Star image near the upper edge of the field distorts concave upward, i.e. pincushion distortion. Even the first class binocular, e.g. Nikon or Zeiss, reveals the same degree of distortion. Considering the super wide field of this binocular, I must say the optics is superb. With a magnification of 15 this binocular is not suitable for detecting small and dark celestial objects, but I have ever observed some of the10th magnitude galaxies. I read somewhere that 11th magnitude galaxies were observable with this binocular. The true worth of this instrument lies in rich field with pinpoint star image and high contrast: the Milky Way or open star clusters were impressive.

Accessories for astronomical use

As Japan is humid dew or frost tend to condense on the objective lenses even if you use build-in hoods. In addition to that the handles for altitudinal axis are too short for smooth motion for comet hunting, and a light shield for eyepieces is essential to concentrate on viewing faint objects, e.g. comets and nebulae. To improve these points I bought a pair of lens hoods, and made extended handles as well as the light shield for eyepieces (Photo 10). The extended handles are made of stainless steel pipes and styrene foam. The bases of the original handles are enlarged by having the rubber band around it so that the diameter of the bases fit the inner diameter of the pipe (swellings at the bases of handles in Photo 1 and 6). The extended handles enable smooth sweeping of the sky with a light touch. The light shield which is made of polyethylene sheet and flocked black paper, can be attached to the eyepieces by a rubber band. Although the binocular field is as wide as 6 degrees, since the eyepieces decline 30 degrees from the optical axis a finder scope is convenient accessory: I attached the Rigel, QuikFinder. As I am eyeglasses wearer an eyepiece without rubber protector damages the eyeglass lens. The rubber protector is not equipped in the original eyepieces of the binocular, and I attached rubber ring sheets to the eyepieces using double-sided adhesive tape (ring-shaped black colored parts on eyepieces in Photo 1 and 10). Though this binocular is not my main instrument, I can enjoy comfortable comet searching with these accessories.


Photo 10 Accessories for astronomical use: extended handles, hoods, light shield for eyepieces,
rubber ring sheets on eyepieces and unit-power finder

Concluding remarks

This binocular is designed uniquely and based on different philosophy from gthe Westh; a prism system that is made the casings shorter, eyepieces with super wide angle, the head rest, and the limbs that are easy to read. On top of that sturdy structure and excellent optics made this instrument attractive.

Top of telescopes' page
Home